DIY felt crafts Sewing Needle book

It can be use to install Needle properly.
 |
| Felt Needle Book Tutorial |
Supplies:
*Felt for the
cover
*Matching
felt piece for button tab
*Coordinating
felt for pages (1 or 2, depending on how many needles you have)
*Rotary
cutter or scissors, pinking shears (optional)
*Button
*Matching
thread and sewing machine
*Additional
felt for embellishing cover
*Fabric glue
for embellishments
1. Cut a piece of felt 8" x
4" for the cover. Cut 1-2 pieces 7.5" x 3.5" for the pages. I
cut mine with pinking shears, but that's optional, of course.


2. Cut a matching piece of felt
for the button tab 1" x 1.5". This part is really optional, too. You
don't have to have a button closure. I rounded one edge with scissors for extra
cuteness. If you don't dare cut it free-hand, trace half of a soda bottle lid.


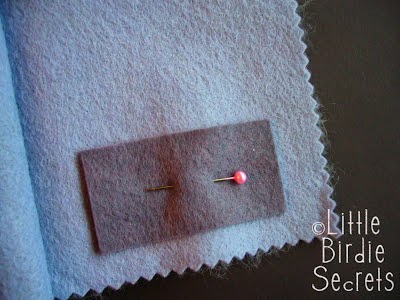
3. Pin the tab to the short,
right side of your cover. Stitch around the entire cover piece, attaching the
tab and creating a cute decorative edge.

4. Lay your pages in the middle
of the inside your cover. Using a ruler, measure to the middle draw a line with
chalk or a fabric pen.


5. Pin the pages to the cover
and stitch down the middle to secure.


6. If you have any blunt-edge
needles (for yarn), you can create a little pocket to hold them in as well. Cut
a piece of felt 1.5" x 2" and pin near the bottom edge of one of the
pages.
7. Stitch around three edges, then stitch parallel vertical
lines about 1/4" apart. Slip blunt-edge needles inside.

8. If you decide to do a tab closure, wrap it around to the
front and lay your button where you want it. Mark it with a fabric pen. Using scissors
snip it open. Be sure to make it snug so it stays buttoned.


9. Stitch your button in place on the front of the cover
directly beneath the buttonhole.

10. You could call it good now, but if you're like me, you
love to play with felt! So let's add a little felt embellishment to the front
cover.
I had just cut a little butterfly out with my Slice machine,
so I used the negative of the die cut to trace a butterfly on my coordinating
felt. Then I hand-stitched it in place with a little embroidery thread. You
could also glue it with fabric glue.


For the red book I cut two felt flowers, layered them, and
attached them together with a fancy brad. I also hand-cut leaves and added a
little stitching, then glued the flowers and leaves on the cover with fabric
glue.

That's it! Now get organized by sticking your needles in the
felt pages. Don't they look cute all lined up?

Credit to Little Birdie Secret.


No comments:
Post a Comment